Along Hamilton’s Waterfront


Known as the City of Waterfalls, Hamilton has implemented a program to promote its beauty and to detract from the “Steel Town” reputation. There are also initiatives to help develop and revitalize the downtown core and waterfront.

Confederation Park
Confederation Park, Hamilton//embedr.flickr.com/assets/client-code.js

Cootes Paradise
Cootes Paradise//embedr.flickr.com/assets/client-code.js

Cootes Paradise//embedr.flickr.com/assets/client-code.js

Cootes Paradise//embedr.flickr.com/assets/client-code.js

Cootes Paradise//embedr.flickr.com/assets/client-code.js

Sunset at Cootes Paradise//embedr.flickr.com/assets/client-code.js

Pier 8
Sunset at Pier 8//embedr.flickr.com/assets/client-code.js

Sunset at Pier 8//embedr.flickr.com/assets/client-code.js

Pier 8//embedr.flickr.com/assets/client-code.js

Ráfaga - Unleashed//embedr.flickr.com/assets/client-code.js

Ráfaga - Unleashed by Veronica and Edwin Dam de Nogales//embedr.flickr.com/assets/client-code.js

Albion Falls
Albion Falls//embedr.flickr.com/assets/client-code.js

Albion Falls//embedr.flickr.com/assets/client-code.js

Albion Falls//embedr.flickr.com/assets/client-code.js

Downtown
Downtown Hamilton//embedr.flickr.com/assets/client-code.js

Downtown Hamilton//embedr.flickr.com/assets/client-code.js

Matsuri – Japanese Summer Festival 2016

During the summer when most people are not working during evenings and weekends, that’s when I start work. Whether freelance or for the company I work for, I work when people are available. So when I get a chance to catch a summer event or have time to hang out with friends, I appreciate the time off.

Here’s what I saw at Mississauga’s first Matsuri – Japanese Summer Festival:

Omikoshi
Matsuri - Japanese Summer Festival//embedr.flickr.com/assets/client-code.js

Nagata Shachu Taiko Drumming
Nagata Shachu//embedr.flickr.com/assets/client-code.js

Nagata Shachu//embedr.flickr.com/assets/client-code.js

Nagata Shachu//embedr.flickr.com/assets/client-code.js

Nagata Shachu//embedr.flickr.com/assets/client-code.js

Mayor Bonnie Crombie Addresses the crowd during 35th Sister City Anniversary Ceremony between Mississauga and Kariya
Mayor Bonnie Crombie addresses the crowd//embedr.flickr.com/assets/client-code.js

Breaking the Mirror Ceremony
Sake Wine Cask Breaking Ceremony
Sake Cask Breaking//embedr.flickr.com/assets/client-code.js

Shishimai – Traditional Japanese Lion Dance

Shishimai - Traditional Japanese Lion Dance//embedr.flickr.com/assets/client-code.js

Fuu-Wa Japanese Group Singers
Fuu-wa//embedr.flickr.com/assets/client-code.js

J-pop: Niji no Conquistador
Niji no Conquistador - J Pop//embedr.flickr.com/assets/client-code.js

Mississauga Kendo Club
Mississauga Kendo Club//embedr.flickr.com/assets/client-code.js

Mississauga Kendo Club//embedr.flickr.com/assets/client-code.js

The Toronto Kimono Club
The Toronto Kimono Club//embedr.flickr.com/assets/client-code.js

The Toronto Kimono Club//embedr.flickr.com/assets/client-code.js

The Toronto Kimono Club//embedr.flickr.com/assets/client-code.js

STORYTiME Contemporary Street Dance Performers
STORYTiME Contemporary: Street Dance Performance//embedr.flickr.com/assets/client-code.js

STORYTiME Contemporary: Street Dance Performance and Workshop//embedr.flickr.com/assets/client-code.js

TBC Buyo Group
TBC Buyo Group//embedr.flickr.com/assets/client-code.js

Kimono Fun Club & Others
Kimono Fun Club//embedr.flickr.com/assets/client-code.js
https://greceln.wordpress.com/wp-admin/post-new.php
Kimono Fun Club//embedr.flickr.com/assets/client-code.js

Kimono Fun Club//embedr.flickr.com/assets/client-code.js

Scenes from Point Pelee National Park

Revisiting Point Pelee//embedr.flickr.com/assets/client-code.js

Did I ever tell you how much I like going to Point Pelee?

I never really knew this place existed until, oddly enough, I played Hangman on the computer. The word Point Pelee kept coming up. It was an odd word and I never knew it existed. One day, curiosity got the better of me and I did more research on it.

Located in Ontario, it’s the southernmost point in Canada and lies just below the 42nd parallel. It is as far south as Rome, Northern Spain and the northern border of California. It is also known as the Carolinian Zone where the average temperature for the year is 8°C. As described on the official Parks Canada site, “Early scientists called this region the Carolinian zone. Now, it is more generally referred to as the eastern deciduous forest, except in Canada where the term Carolinian is still popular because of its southern flavour.” Considering the massive size of Canada, this zone is only a tiny fraction of the country. The reason it stays warmer than Laramie, Wyoming (which is considered the center of the continent and on the same parallel as Point Pelee) is because it is surrounded by large bodies of water that helps to maintain heat better. It serves as a migration center for birds in the spring and fall and plays host to 370 species of birds.

This year, I managed to make two trips to the park and only because I was working on location in nearby towns. With the three hour drive from where I live to get to Point Pelee, it’s difficult to make it there on its own, unless I make a weekend trip to the area. It just makes it more difficult for sunrise and sunset photography. The park does operate from 6:00am – 10:00pm in the summer and it does change depending on the time of year it is. As you can imagine, if I really wanted to, I’d have to make an effort to leave at 3:00am just to make it to the gate at sunrise. That is why when I did so, I appreciate being able to get the sunrise shots all the better.

Without further adieu, here’s what I captured in recent weeks:

Lookout Point
Lookout Point, Sunrise at Point Pelee//embedr.flickr.com/assets/client-code.js

Lookout Point, Sunrise at Point Pelee//embedr.flickr.com/assets/client-code.js

Lookout Point, Sunrise at Point Pelee//embedr.flickr.com/assets/client-code.js

Marsh Boardwalk
Marsh Boardwalk, Sunrise at Point Pelee//embedr.flickr.com/assets/client-code.js

Yellow Pond Lily (Spatterdock)
Yellow Pond Lily//embedr.flickr.com/assets/client-code.js

Revisiting Point Pelee//embedr.flickr.com/assets/client-code.js

Revisiting Point Pelee//embedr.flickr.com/assets/client-

Revisiting Point Pelee//embedr.flickr.com/assets/client-code.js

Yellow Pond Lily//embedr.flickr.com/assets/client-code.js

Revisiting Point Pelee//embedr.flickr.com/assets/client-code.js

Revisiting Point Pelee//embedr.flickr.com/assets/client-code.js

Revisiting Point Pelee//embedr.flickr.com/assets/client-code.js

Light Photography

Most often when I do work for my company or through freelance work, I like to keep them confidential unless I’m given permission for portfolio purposes. For portfolio work, I head to the studio. This way, I have permission from the model to post their images and people can see what I can do.

On June 15th, I managed to drop in at the studio as a last minute decision to catch one of their workshops (posted that morning) that was held in the evening. The theme was patterns and lights. I worked with both Canon and Nikon during the light photogrpahy portion. Both cameras were on a tripod with Canon having a wider shot. I wanted to see if there was a difference between the two cameras. Aside from the slight variation in settings, the images were slightly different in that Canon had a warmer tint. I was able to warm up the images for Nikon in the editing stage. Here’s what I took:

Lights and patterns//embedr.flickr.com/assets/client-code.js

Lights and patterns//embedr.flickr.com/assets/client-code.js

Lights and patterns//embedr.flickr.com/assets/client-code.js

LIght Photography, Canon//embedr.flickr.com/assets/client-code.js

Light Photography, Canon//embedr.flickr.com/assets/client-code.js

Light Photography, Canon//embedr.flickr.com/assets/client-code.js

Nikon D7000 – 20 second exposure
Light Photography, Close up, Silhouette, Nikon//embedr.flickr.com/assets/client-code.js

Canon Rebel T2i – 30 second exposure
Light Photography, Wide shot, Canon//embedr.flickr.com/assets/client-code.js

Light Photography, Wide shot, Canon//embedr.flickr.com/assets/client-code.js

A Beautiful Day

© All Rights Reserved

© All Rights Reserved

On Saturday, May 3rd and Sunday, May 4th, I grabbed my camera and decided to learn how to do time lapse. Initially, I took a cable release and stood there as the sun started to set. I set my Nikon D7000 on timer with 9 photos per click and 3 second delay between photos. I ended up spending almost 50 minutes. While the sunset was beautiful, I’m sure there was a more efficient way to do time lapse as I’ve seen several examples of night photography with star trails. There are cable releases specifically made to have a timer on them. My camera can also do intervals. You can set how long you want it to run with x number of photos to be taken and how many seconds or minutes you want it to wait between each shot. This is far more effective as I went online to do more research. I was limited to the number of shots I can take since I only had a 16gb SD card and I shot in both RAW and Fine jpeg formats.

Uploading and doing minor edits took a long time but in the end I was happy with what I got. On the fourth try, I took a little more time in ensuring the camera was set perfectly, i.e. focus. It was an oversight. I focused on the subject and switched the lens to manual mode thinking it would help time lapse run smoother. I did learn how to do animated gifs over a year ago and tried to apply the same principles on Photoshop to create a time lapse. I also wanted to compare how much better, or easier it would be to create a time lapse on Lightroom. I found that it was a lot of work to manage all the layers on timeline in Photoshop. At the most for one time lapse, I had about 500 photos and at the very least, I had about 150. On the other hand, Photoshop has a lot of good editing features as well as having a lot of options when converting to a video for rendering. With Lightroom, there is a plugin to create a video. I did see online that there are some extra features if you have it. In this case, I did not. After completing my edits, I went to Slideshow, converted the photos to create a slideshow and exported it as a video. Here are the results:

Click on the links:
A Sunday in Mississauga

Mississauga After Dark

For more, check me out on Flickr:

Spring is here! Cherry Blossoms

A Glowing Effect

I recently visited Ripley’s Aquarium in Toronto and it was an awesome experience. I chose a non-holiday weekday to be sure I didn’t have to deal with a large crowd. If I wasn’t so tired, I probably would have taken more time to photograph and see every corner of the place. I’m sure I missed a few spots.

As a photographer, there were a lot of challenges, mainly the various lighting conditions for each aquarium. My Nikon D7000 goes up to ISO 6400, then H.03, H.07, H.1.0 and H2.0. Working at the lowest possible ISO is always best but you have to look at the situation and make adjustments. Indoors are often darker and you also have to see if the subject can sit still or not. The shutter speed has to be fast enough so the fishes won’t get blurred as it passes by. A minimum of 1/125 is good. I pushed my ISO to 6400 which is the max I’m willing to work with. It is grainy at this point but if I had gone higher, the quality would be far worse. In some situations, photos were darker but manageable in post editing.

I read on some tips and tricks on how to photograph at a public aquarium. Some suggest that you have to keep your camera flat up against the glass to reduce glare and reflections. Or block out as much light as possible. I’m sure all these are plausible…. if I can just make a request to management to shut off the lights outside of the aquarium to create a studio experience. Holding the camera right up to the glass was hard with the fishes swimming right up to it.

Another difficulty I had was photographing the jellyfish. Their edges were less defined. I did get some good photographs. While processing the images, I checked some examples of jellyfish photos. Many of them were glowing and I wanted to achieve that same effect. Here is how I did it:

Original

© All Rights Reserved

© All Rights Reserved

Dark Version and Light Version

In Lightroom, I created two virtual copies of the same photo and changed the settings to create a light and dark version.

© All Rights Reserved

© All Rights Reserved

© All Rights Reserved

© All Rights Reserved

Final Photograph

In the menu bar of Lightroom, I went to Photo – Edit In and chose Photoshop. I used Photoshope CS6. I opened both the light and dark versions. I selected the dark version and copied and pasted it onto the light version. There are now two layers, the lighter one being on the bottom in the layers panel. I closed the dark version without saving. I like to Layer from Background and name it Original. Then duplicate that and call it Edited. Then I lock the Original layer. I turned off the dark layer for now by clicking on the eye. I created a selection around the jellyfish and saved the selection. With this selection saved, I can also target the same area for other adjustments. I chose Refine Edge and adjusted the Smooth and Feather section. With the dark layer reactivated, I used the eraser tool and reduced the opacity to less than 50%. With the selection on, I erased the image to reveal the lighter jellyfish below. The image within the selection was only erased. With the selection still activated, I went to the Adjustment section and chose Brightness/Contrast. A mask was created. I kept adjusting until it gave the glow I wanted. Contrast helped the image to stand out more. To make the background darker, I chose the same selection and inversed it. I created a mask by going to the adjustment layer again for Brightness/Contrast and punched in a negative number. I’ve also used Vibrance on some of my images.

Here is the final image:

© All Rights Reserved

© All Rights Reserved

This is one way of making something glow. If you Google how to make something glow in Photoshop, there will be all kinds of samples such as creating a soft glow effect of a scenery to making text glow.

Portraits

© All Rights Reserved

© All Rights Reserved

Have any of you tried pet photography?

If you have, you would know the difficulty in capturing pets because they are constantly moving around. With the guidance of the owner, you can get a pet to look at the camera with commands and calling out their name. I had the experience of photographing a handful of pets to build a portfolio. While difficult, especially with the last dog being blind, I found it tiring as well as satisfying.

I’ve talked to several people about pet photography. For those who have lost their loved ones, they have told me they wish they had professional photos done as a keepsake. Up until I had three cats, I never understood why people were so attached to their four-legged fur friends. I now know that pets are considered family and it’s tough when you lose one. I once gave one of the kittens away when my cat gave birth to three. I cried.

As I begin to practice more with pets, I managed to capture a few photos in HDR – high dynamic range. For those who know, HDR photos require more than one photo bracketed in different exposures. When merged, it will give a greater tonal range between highlights and shadows. To achieve this is extremely difficult with pets because they are always on the move unless resting. An example below is my pet cat in HDR.

© All Rights Reserved

© All Rights Reserved

What separates a picture from a portrait is how the image is captured. A plain picture can be made extraordinary by changing the angle or zooming in to give it a different perspective.

For more images on animals and pet photography, click on the link here: http://goo.gl/IKwJQc

HDR – High Dynamic Range

What is High Dynamic Range?

While many photographers know what high dynamic range is, we shouldn’t expect everyone to know it. According to Wikipedia, high dynamic range is a set of methods used in imaging and photography to capture a greater dynamic range between the lightest and darkest areas of an image than current standard digital imaging methods or photographic methods. What this essentially means is that a camera at normal settings cannot capture the same tonal range as what the human eye can see. HDR helps to a create a greater tonal range between between highlights, shadows and midtones by first taking three or more photographs at different exposure levels (called bracketing) and then merging them into one.

Here are some tips for HDR:

• Great for portraits outdoors, landscapes, architecture/real estate, low light and backlit scenes
• Not so great if something is in motion like people and animals
• Use a tripod and a shutter cable release to avoid ghosting and misalignment
• Learn to automate bracketing on your camera; basic instructions for Nikon D7000 camera below
• Buy software that helps to merge the photos together
• Have a computer and external hard drive with a capacity to hold large amounts of images

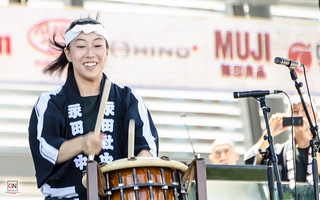
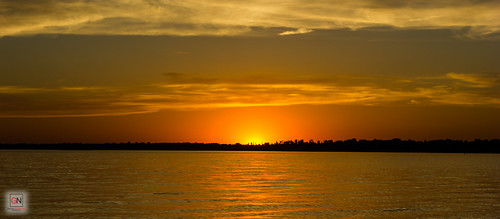
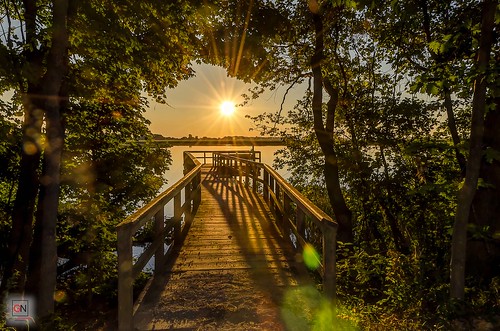
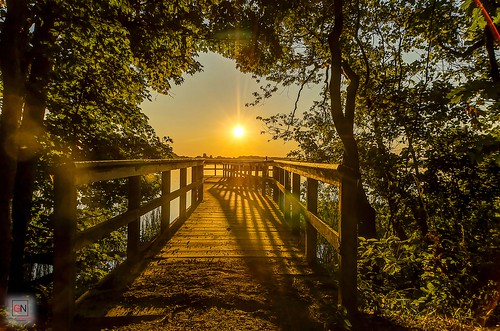
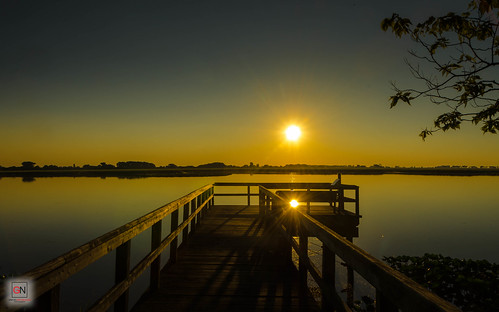
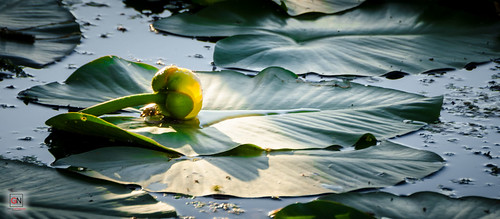
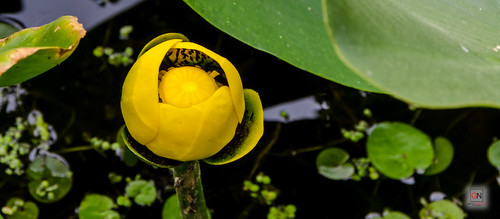
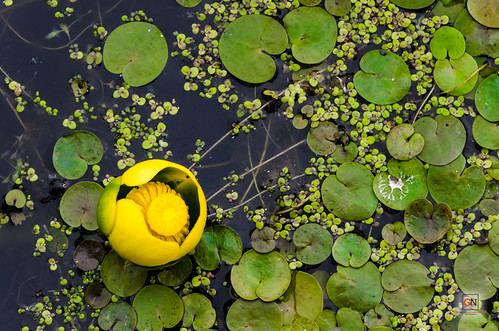
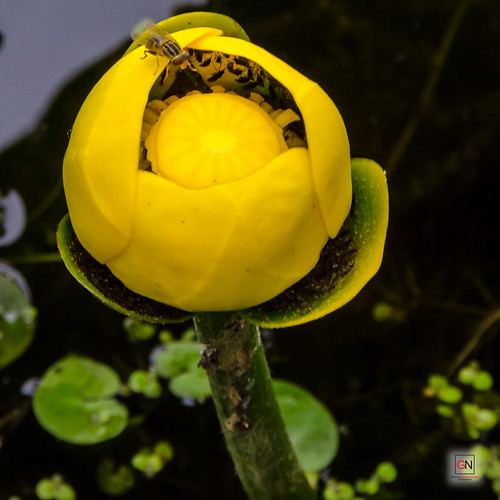
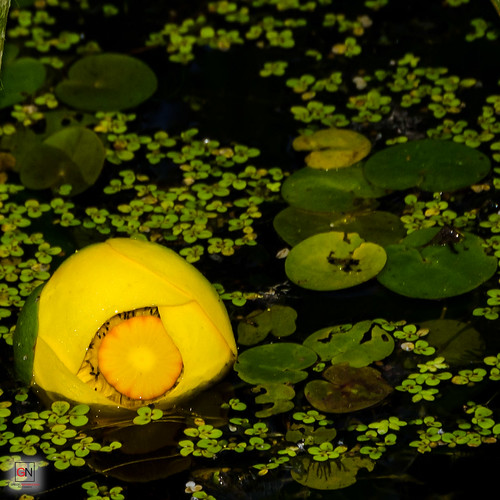
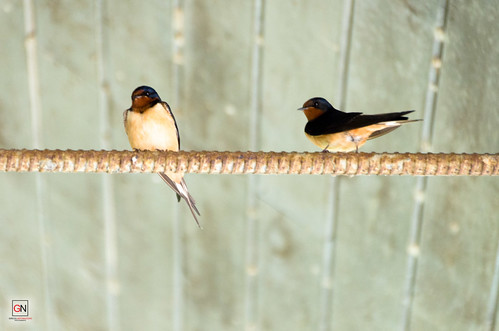
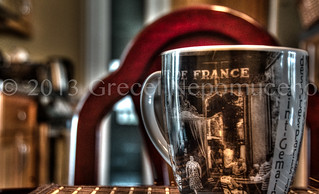
Here are some examples of HDR photos created from bracketed photos.

ROM HDR-2

HDR

Wordpres

Canadian National Exhibition

Sauble Beach

Sauble Beach 2-2

Origami

Places - HDR

Sacred Stones Tour

In two samples above, I compare an iPhone photo with no editing and with the same photos created in HDR. Also, the last photo taken in a church shows greater detail in HDR. There is contrast between the backlit room and the dark wooden pews. Under normal circumstances, it would be difficult to balance the place out because of the highlights where sun is coming through the windows and the dark pews. Without editing, either the windows would be overexposed or the pews would be under exposed. In all instances, I used Photomatix to create HDR.

Here are the steps to creating HDR:

Prepping for HDR using a Nikon D7000

1. Press the bracketing button (below the flash button called BKT). In the settings display, change the exposure value (EV) to between 0.3 to 2.0 using the aperture dial and use the shutter dial to increase the steps to 3F.

2. Change the shooting dial from S (single) to CH for continuous burst mode.

3. When photographing, hold the camera button or shutter release cable down long enough for all three photos to be taken.

When merging in Photomatix, it will ask you to choose bracketed photos. A dialog will pop up and you can choose your options for processing which include alignment, remove ghosting (it occurs when something in motion passes through a long exposure photograph or when an object in a multiple exposure image don’t align) and reduce chromatic aberration [the inability of a lens to bring all wavelengths of light (especially red and blue) into the same plane of focus] and cropping. This is very important if you didn’t use a tripod. Unless you have very sturdy hands, any slight misalignment will show around the edges when the images are merged. After options are selected, click process. This will take time and the three images will turn into one. From here you have numerous options including sliders on the one side for editing. When complete, click process again and it will take you to the final stage for completion. This will include contrast, colour, and sharpness.

Creating HDR can be long and tiresome if you have several of them to do. I have learned to be selective but when the opportunity is there and I only have thirty seconds, I will take the photo. It is a hit and miss. When it does work, it’s definitely worth while. Below are more tips and advice from sources I’ve found.

Resources

HDR Software Review

Top 20 Best HDR Software Review 2022

How to Geek “What is HDR photography, and How Can I Use It?”
http://www.howtogeek.com/64320/htg-explains-what-is-hdr-photography-and-how-can-i-use-it/

More Tips For HDR

Faking HDR Effect
http://still-scripts.com/photoshop/faking-the-hdr-effect-using-only-one-photo-and-photoshop/

My HDR Photos

Places - HDR

On Being A Photographer

“I’ve missed more than 9000 shots in my career. I’ve lost almost 300 games. 26 times, I’ve been trusted to take the game winning shot and missed. I’ve failed over and over and over again in my life. And that is why I succeed.”

Michael Jordan

I was asked once by someone why I couldn’t get the perfect shot. After all I am the photographer and that I have already been working as a photographer for more than a year. Really? I’m gonna run home now to begin practicing taking the perfect photograph every time.

Sarcasm aside, what people don’t understand is that you are not going to get the perfect head shot, portrait, or whatever perfect at every instant. A professional photographer with years of experience will work quicker, yes. And even at my current job, I’m required to get two portraits in less than a minute for each student at school. I don’t have all day to get the perfect shot. What I am addressing here is the expectation that because I am a photographer now, I will always be perfect every time. That is a ridiculous expectation. If it were the case that everyone is perfect at what they do all of the time, nothing would seem extraordinary anymore. It would be normal to be good at what you do and that you should always be hitting it when you get asked to work your talent. Being successful to me is knowing what is lacking or failing – or even knowing something is already good – and trying to get something better.

Famous-Failures-Quotes-Thoughts-on-Failures-Images-Wallpapers-Pictures

Published in: on September 3, 2013 at 7:28 pm  Comments (1)  
Tags: , , , , , , , , , ,

My Portfolio

For a brief moment in my blog titled The Price of Being Single and Independent, I slightly touched upon being laid off and being in a career transition. I was laid off four years ago. While I continued to try to find work in my previous field, I started to think about what I want to do. Do I really want to work hard for money while feeling unhappy and unsatisfied? I mean… I’m not that old. I did spend thirteen years at the one job, not twenty like some of the others who were laid off along with me. I took a publishing course and realized I was competing against mostly English major students in class. Maybe I should leave these jobs to them knowing they’d probably be better at it. From then on, I just picked up a camera and started photographing. At first taking hundreds of photos trying to figure out the settings and seeing how it looks. I did take classes as well as some workshops. Eventually, I ended up interning at Bell in their PMP program as a photographer. Honestly, I know my portfolio wasn’t strong back then. I learned a lot from them and have now come out with a portfolio. I am trying to get a website together. In the meantime, here is some of my work on Flickr.

Studio Shoot Set

Studio Shoot

Photostream

Spring is here! Cherry Blossoms

Bell PMP
http://thepmp.ca/pmp/

“I hope that my work will encourage self expression in others and stimulate the search for beauty and creative excitement in the great world around us.”—Ansel Adams